
We’re on Cloud (Build) 9 with this Dagster secret
Here at Thinking Machines, we design and deliver end-to-end data platforms and infrastructure to different organizations. As one of the key components of our solutions, we develop scalable and efficient ETL pipelines that allow our clients to move, categorize, and standardize data they already have.
When selecting tools, open source is the way to go. This encourages developers to openly share and collaborate with others. As mentioned by opensource.com, “it's the people who produce, test, use, promote, and ultimately affect the software they love”.
As such, we’re big fans of Dagster. Dagster is a task orchestrator for machine learning, analytics, and ETL. We’ve used Dagster to develop both ETL and ML pipelines for several clients. In fact, check out our previous story explaining how we use Dagster to achieve ML Ops.
To speed up delivery and our development workflows, we like to pair Dagster with our CI/CD tool of choice, Cloud Build. Cloud Build is native to Google Cloud Platform’s (GCP) ecosystem, which is perfect for us since we work with GCP to deliver our platforms. GCP also actively maintains official open source builders for common languages and tasks.
In the spirit of open source, here's a guide on how to implement one of our common workflows with Dagster and Cloud Build. If you’re familiar with GitHub Actions, Cloud Build shouldn’t feel too different. If this is your first time touching a CI/CD tool, don’t fret! We’ll hold your hand all along the way.
"Good to know"s before we continue
- A basic understanding of Google Cloud Platform
- An understanding of Docker
- Dagster
GitHub repository for this article: thinkingmachines/cloudbuild-dagster (github.com)
1. Containerize your application
Let’s say you have a directory structured this way:
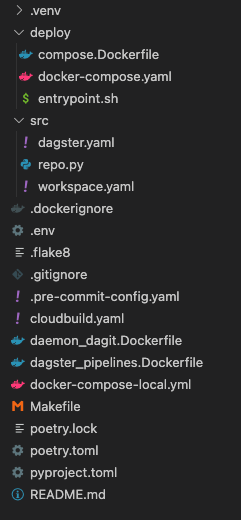
What’s expected here:
- Define your app's environment with a Dockerfile so it can be reproduced anywhere.
- Define the services that make up your app in docker-compose.yaml so they can be run together in an isolated environment.
- Define another Dockerfile that will be used to run docker-compose commands and spin up our Dagster services.
- Define another Dockerfile that will only contain pipeline code.
Why do we have three Dockerfiles?
While Google Container-optimized OS already includes Docker, it doesn’t include docker-compose and you won’t be able to install it. While you can simply just run a one-off container to invoke docker-compose commands, that isn’t exactly reproducible if we want continuous deployment.
- deploy/compose.Dockerfile is what Cloud Build will use to build a one-off container that already has docker-compose installed.
- An entrypoint.sh will be used to simply run the docker-compose commands as soon as the container starts
- daemon_dagit.Dockerfile will create an image that contains the code and configurations for long-running services such as Dagit and Dagster Daemon, and the gRPC server. This image will also store two key Dagster configuration files: workspace.yaml and dagster.yaml.
- pipelines.Dockerfile will create an image that contains all of our pipeline code. This image will be reused for every new pipeline run.
Separating Dagster from any pipeline code will allow us to launch each pipeline run in its own isolated container. If you want to learn more, check out Dagster’s official documentation on multi-container deployments: Deploying Dagster to Docker | Dagster.
Understanding the docker-compose file
There are a total of 4 services that will run once you deploy Dagster through this docker-compose.yaml file:
- Postgres: storage for run, schedule, and event logs
- Dagit: serves the user interface and responds to GraphQL queries
- gRPC server: helps us load user code and launch pipeline runs in their own isolated containers
- Dagster Daemon: responsible for taking pipeline runs off of the queue, launching them, and creating runs from schedules or sensors.
version: "3.7"

services:
# This service runs the postgres DB used by dagster for run storage, schedule storage,
# and event log storage.
 dagster_postgresql:
   image: postgres:11
   container_name:  dagster_postgres
   environment:
     POSTGRES_USER: "${DAGSTER_POSTGRES_USER}"
     POSTGRES_PASSWORD: "${DAGSTER_POSTGRES_PASSWORD}"
     POSTGRES_DB: "${DAGSTER_POSTGRES_DB}"
   networks:
     - dagster_network
   volumes:
     - dagster-pg:/var/lib/postgresql/data:delegated

 # This service runs the gRPC server that loads your user code, in both dagit
 # and dagster-daemon. By setting DAGSTER_CURRENT_IMAGE to its own image, we tell the
 # run launcher to use this same image when launching runs in a new container as well.
 # Multiple containers like this can be deployed separately - each just needs to run on
 # its own port and have its own entry in the workspace.yaml file that's loaded by dagit.
 dagster_pipelines:
   image: gcr.io/${GCP_PROJECT_ID}/dagster-pipelines:${SHA}
   container_name: dagster_pipelines
   restart: always
   environment:
     DAGSTER_POSTGRES_HOSTNAME: "${DAGSTER_POSTGRES_HOSTNAME}"
     DAGSTER_POSTGRES_USER: "${DAGSTER_POSTGRES_USER}"
     DAGSTER_POSTGRES_PASSWORD: "${DAGSTER_POSTGRES_PASSWORD}"
     DAGSTER_POSTGRES_DB: "${DAGSTER_POSTGRES_DB}"
     DAGSTER_CURRENT_IMAGE: gcr.io/${GCP_PROJECT_ID}/dagster-pipelines:${SHA}
   networks:
     - dagster_network

 # This service runs dagit, which loads the pipelines from the user code container.
 # Since our instance uses the QueuedRunCoordinator, any runs submitted from dagit will be put on
 # a queue and later dequeued and launched by dagster-daemon.
 dagit:
   image: gcr.io/${GCP_PROJECT_ID}/daemon-dagit:${SHA}
   entrypoint:
     - dagit
     - -h
     - "0.0.0.0"
     - -p
     - "3000"
     - -w
     - workspace.yaml
   container_name: dagit
   expose:
     - "3000"
   ports:
     - "3000:3000"
   environment:
     DAGSTER_POSTGRES_HOSTNAME: "${DAGSTER_POSTGRES_HOSTNAME}"
     DAGSTER_POSTGRES_USER: "${DAGSTER_POSTGRES_USER}"
     DAGSTER_POSTGRES_PASSWORD: "${DAGSTER_POSTGRES_PASSWORD}"
     DAGSTER_POSTGRES_DB: "${DAGSTER_POSTGRES_DB}"
   volumes: # Make docker client accessible so we can terminate containers from dagit
     - /var/run/docker.sock:/var/run/docker.sock
   networks:
     - dagster_network
   depends_on:
     - dagster_postgresql
     - dagster_pipelines

 # This service runs the dagster-daemon process, which is responsible for taking runs
 # off of the queue and launching them, as well as creating runs from schedules or sensors.
 dagster_daemon:
   image: gcr.io/${GCP_PROJECT_ID}/daemon-dagit:${SHA}
   entrypoint:
     - dagster-daemon
     - run
   container_name: dagster_daemon
   restart: on-failure
 # Make sure to set the same environment vars as the dagster_pipelines service
   environment:
     DAGSTER_POSTGRES_HOSTNAME: "${DAGSTER_POSTGRES_HOSTNAME}"
     DAGSTER_POSTGRES_USER: "${DAGSTER_POSTGRES_USER}"
     DAGSTER_POSTGRES_PASSWORD: "${DAGSTER_POSTGRES_PASSWORD}"
     DAGSTER_POSTGRES_DB: "${DAGSTER_POSTGRES_DB}"
   volumes: # Make docker client accessible so we can launch containers using host docker
     - /var/run/docker.sock:/var/run/docker.sock
   networks:
     - dagster_network
   depends_on:
     - dagster_postgresql
     - dagster_pipelines

networks:
 dagster_network:
   driver: bridge
   name: dagster_network
volumes:
 dagster-pg:
Adjusting our Dagster configuration files
Before we go any further, we’ll have to make a few configuration changes.
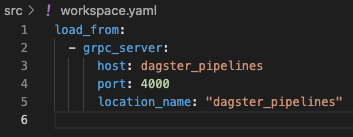
In the workspace.yaml file, configure the gRPC server as a repository location to load user code from. Note that the values used for host and location_name simply refer to the container name of our dagster_pipelines service defined in docker-compose.yaml:
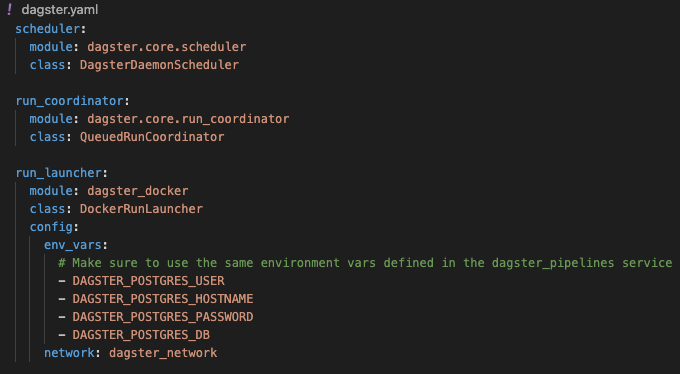
In the dagster.yaml file, configure a run launcher to use the DockerRunLauncher class. Don’t forget to:
- input the same environment variables defined in your dagster_pipelines service.
- point the network to the network we defined in docker-compose.yaml.
Now to test your docker-compose yaml file locally, simply run docker-compose -f docker-compose-local.yaml up -d


The compose.Dockerfile
To create our one-off docker-compose image, we’ll create a very simple Dockerfile.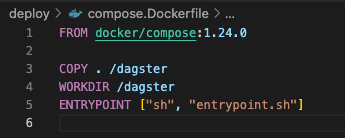
Our deploy/compose.Dockerfile does the following:
- Copy docker-compose and entrypoint.sh to the filesystem of our container
- Configure entrypoint.sh to run as soon as the container starts
Our one-off docker-compose container’s bootstrap
If we take a look at deploy/entrypoint.sh, we’ll see the following commands:
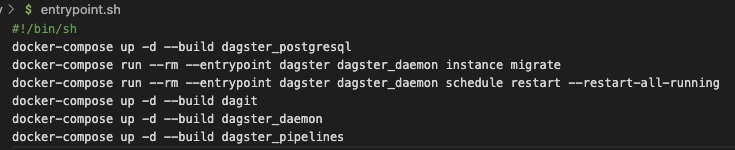
What this bootstrap does is the following:
- Rebuild your database that stores event metadata
- Migrate any out-of-date configurations
- Restart all pipeline schedules
This bootstrap will run whenever we deploy Dagster using our Cloud Build instructions, which we’ll get to soon.
2. Prepare your GCP Resources
Enable the following APIs or Services in GCP
- Container Registry API
- Cloud Build API
- Secret Manager API
- Compute Engine API
Create a Service Account
A best practice we do here in TM is to avoid using default service accounts. Instead, create another service account that will be later attached to your GCE instance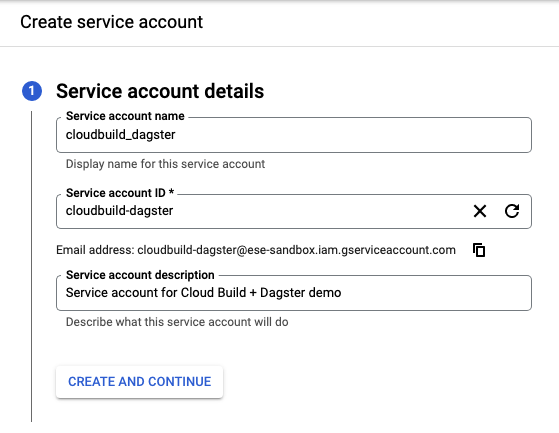
VPC Network
In case you haven’t noticed, each new project you create in GCP starts with a default VPC network. You may use this default network to continue.*Note: The default network’s configurations are not considered safe for production. You’d ideally want stricter networking configurations. Here in Thinking Machines, we always configure stricter firewall policies, use Identity-Aware Proxy (IAP) for TCP forwarding, and avoid creating instances with Public IP addresses.
We’ll leave the extra network configurations to you as an extra challenge ;)
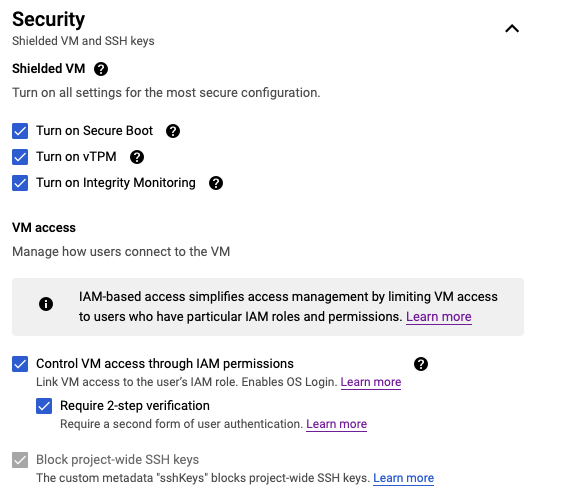
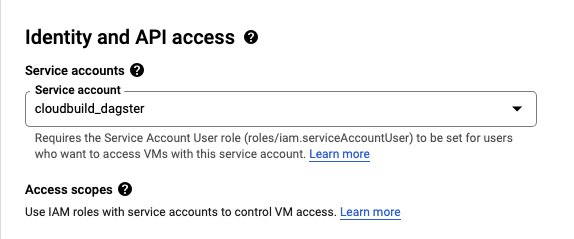
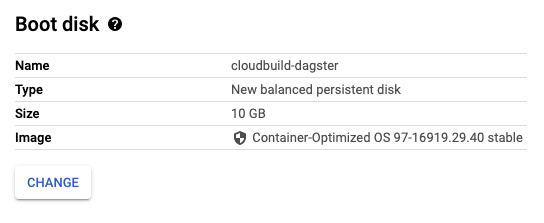
Google Compute Engine (Virtual Machine)
For demonstration purposes, we would recommend choosing an e2-small instance type. You may choose whatever region or zone is closest to your location.*Tip: We also implement OS Login to simplify and harden SSH access management. If you want to implement that, you may refer to these guidelines: Set up OS Login
Reminder: Make sure to attach the service account you created earlier
Reminder: Select Container-Optimized OS
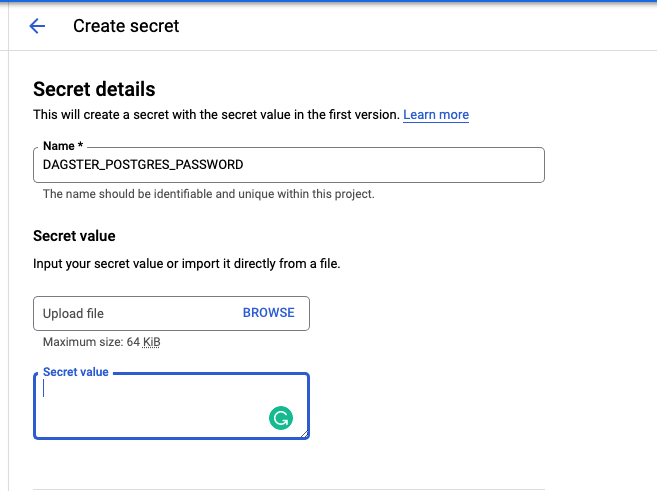
Secret Manager
For variables that contain sensitive information such as database credentials, we highly recommend storing them in Secret Manager.To create and manage access secrets, you may refer to these guidelines: Creating and accessing secrets
3. Configuring Cloud Build
Additional IAM Permissions for the Cloud Build Service Account
Since the build will require access to Compute Engine resources and run certain commands using the GCE instance’s attached service account, assign the following roles to the Cloud Build service account through the IAM page.- Compute Instance Admin (v1)
- Service Account User
- IAP-tunnel secured user*
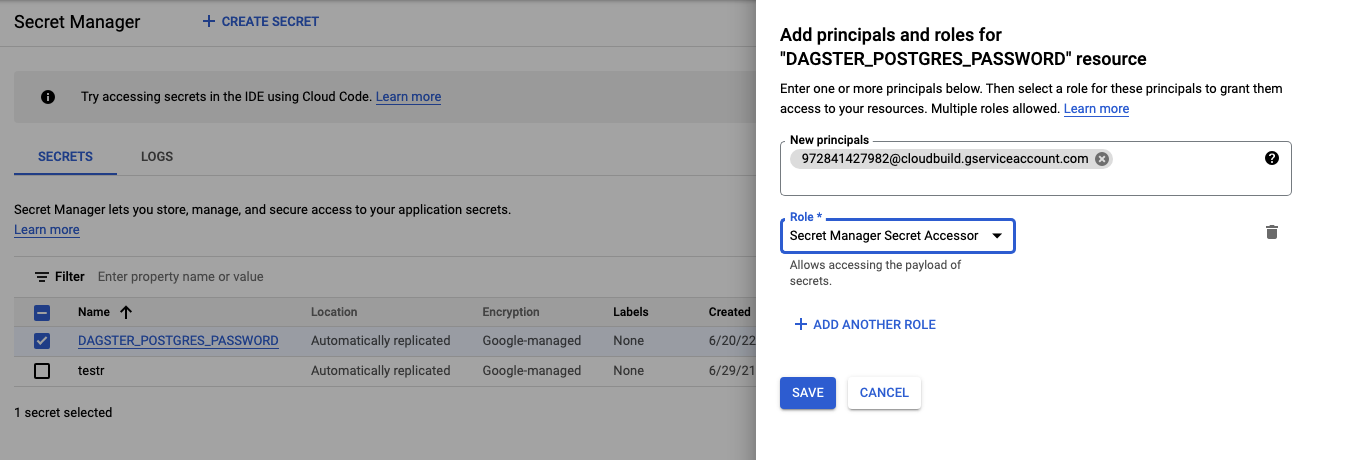
- Secret Manager Secret Accessor
If you’re not sure what the Cloud Build service account is, look for the principal that has @cloudbuild.gserviceaccount.com in its name. There should only be one Cloud Build service account that was automatically created after enabling the Cloud Build API.

For your secrets, grant the Cloud Build service account the Secret Manager Secret Accessor role in each individual secret.
Setting up the Trigger
Head over to the Cloud Build page and create a build trigger. We’ll expect this build trigger to point to a selected repository by the end of this section.

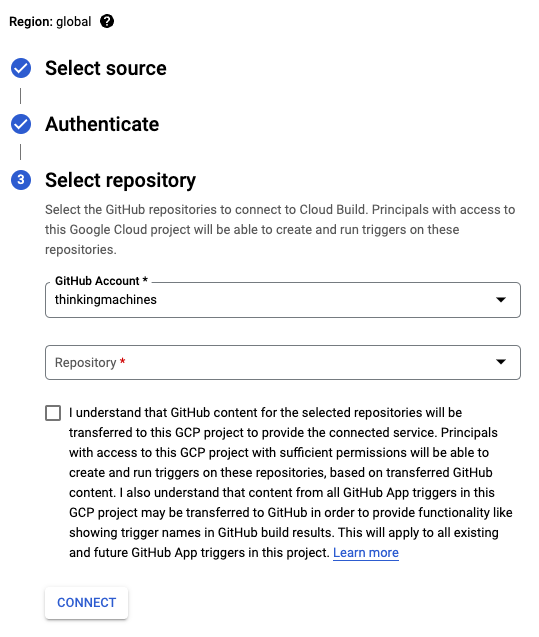
A unique name will be required for the trigger. We’ll go for the default Push to Branch event. Once you head over to the source section, click on CONNECT NEW REPOSITORY

You’ll be prompted to select a source. For this article, we’ll select GitHub.
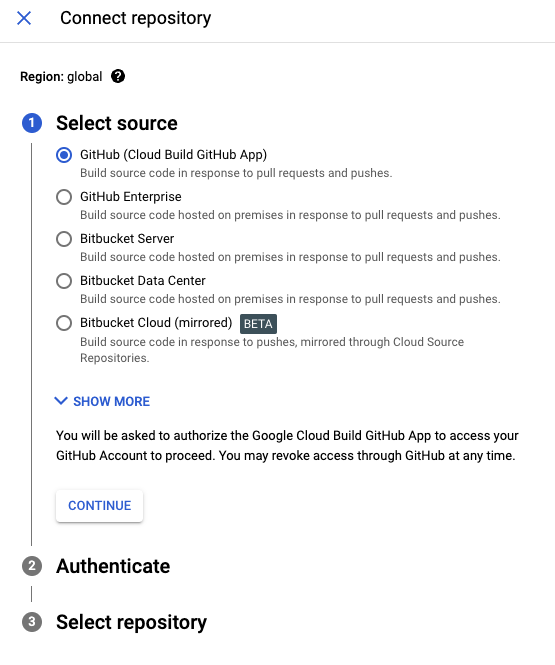
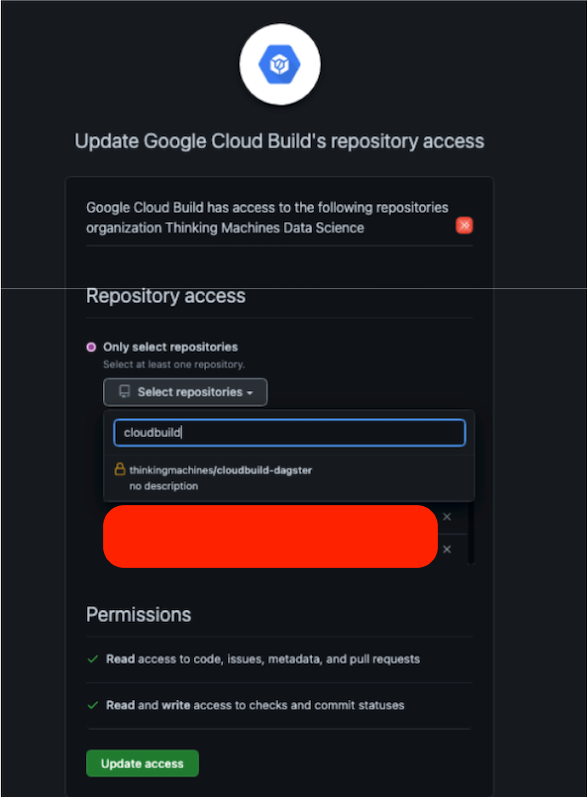
If this is your first time connecting a repository to Cloud Build, a pop-up window will appear to ask you to authenticate. Once that’s all sorted out, you will see a window that will let you select your target repository. If you have several accounts, you may select one through the GitHub Account dropdown menu.
Trigger Variables
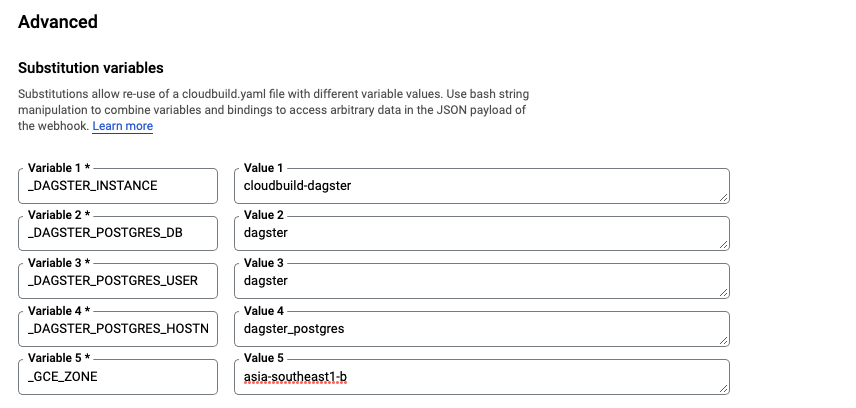
After creating the trigger, go back to the trigger page and click on the name of your trigger.Once you’re on the trigger configuration page, scroll down to Advanced > Substitution variables and enter the following key pair values:
- _GCE_ZONE (the zone where your GCE VM is hosted)
- _DAGSTER_INSTANCE (the name of your GCE VM)
- _DAGSTER_POSTGRES_DB (the Postgres database name)
- _DAGSTER_POSTGRES_USER (the Postgres username)
- _DAGSTER_POSTGRES_HOSTNAME (the Postgres container name)
Note that in order for Cloud Build to recognize trigger variables, trigger variables must ALWAYS have an underscore at the beginning of their names.
Don’t forget to hit SAVE!

The Cloud Build YAML file
Similar to .github/workflows/ in GitHub Actions, Cloud Build workflows are instantiated whenever you have a file named cloudbuild.yaml in your repository. Let’s create one right now
If you’re not familiar with Github Actions, don’t sweat it. Cloud Build is similar as it executes your build/workflow as a series of build steps, where each build step is run in its own Docker container.
Now let’s focus on a specific step called deploy-dagster. You’ll notice an interesting body of args. If you’re familiar with SSHing into a GCE instance through the CLI, that is exactly what you’re doing.
If we were to break deploy-dagster down, this is what’s going on:
- From the current Cloud Build step container, SSH into the GCE instance.
- Pull the three images you’ve built and pushed to Container Registry into the GCE instance.
- Run the docker-compose container.
- All of our services and dagster configuration updates will automatically run inside this container thanks to our handy entrypoint.sh bootstrap.
You’ll also notice that in order to use the secrets you’ve stored in Secret Manager, you’ll need to use $$ instead of $ to reference such variables.
steps:
 - id: build-daemon-dagit
   waitFor: ["-"]
   name: gcr.io/kaniko-project/executor:latest
   args:
     - "--dockerfile=daemon_dagit.Dockerfile"
     - "--context=dir:///workspace"
     - "--destination=gcr.io/${PROJECT_ID}/daemon-dagit:${SHORT_SHA}"
     - "--cache=true"

 - id: build-dagster-pipelines
   waitFor: ["-"]
   name: gcr.io/kaniko-project/executor:latest
   args:
     - "--dockerfile=dagster_pipelines.Dockerfile"
     - "--context=dir:///workspace"
     - "--destination=gcr.io/${PROJECT_ID}/dagster-pipelines:${SHORT_SHA}"
     - "--cache=true"

 - id: build-dagster-compose
   waitFor: ["-"]
   name: gcr.io/kaniko-project/executor:latest
   args:
     - "--dockerfile=compose.Dockerfile"
     - "--context=dir:///workspace/deploy"
     - "--destination=gcr.io/${PROJECT_ID}/dagster-compose:${SHORT_SHA}"
     - "--cache=true"

 - id: cleanup-ssh-keys
   waitFor: ["-"]
   name: gcr.io/cloud-builders/gcloud
   entrypoint: "bash"
   args:
     - "-c"
     - |
       for i in $(gcloud compute os-login ssh-keys list)
       do
         echo $i;
         gcloud compute os-login ssh-keys remove --key $i || continue
       done

 - id: docker-permissions
   waitFor: ["cleanup-ssh-keys"]
   name: gcr.io/cloud-builders/gcloud
   args:
     - compute
     - ssh
     - "--zone=${_GCE_ZONE}"
     - "--ssh-key-expire-after=1m"
     - "${_DAGSTER_INSTANCE}"
     - "--"
     - |
       sudo groupadd docker
       sudo usermod -aG docker $${USER}
       sudo docker system prune -a -f

 - id: deploy-dagster
   waitFor:
     [
       "build-daemon-dagit",
       "build-dagster-compose",
       "build-dagster-pipelines",
       "docker-permissions",
     ]
   name: gcr.io/cloud-builders/gcloud
   entrypoint: "bash"
   args:
     - -c
     - |
       gcloud compute ssh --zone=${_GCE_ZONE} --ssh-key-expire-after=1m ${_DAGSTER_INSTANCE} -- \
       "docker-credential-gcr configure-docker gcr.io && \

       docker pull gcr.io/${PROJECT_ID}/daemon-dagit:${SHORT_SHA} && \
       docker pull gcr.io/${PROJECT_ID}/dagster-pipelines:${SHORT_SHA} && \
       docker pull gcr.io/${PROJECT_ID}/dagster-compose:${SHORT_SHA} && \

       docker run --rm \
         -v "/var/run/docker.sock:/var/run/docker.sock" \
         --env "DAGSTER_POSTGRES_DB=${_DAGSTER_POSTGRES_DB}" \
         --env "DAGSTER_POSTGRES_USER=${_DAGSTER_POSTGRES_USER}" \
         --env "DAGSTER_POSTGRES_HOSTNAME=${_DAGSTER_POSTGRES_HOSTNAME}" \
         --env "DAGSTER_POSTGRES_PASSWORD=$$DAGSTER_POSTGRES_PASSWORD" \
         --env "GCP_PROJECT_ID=${PROJECT_ID}" \
         --env "SHA=${SHORT_SHA}" \
         gcr.io/$PROJECT_ID/dagster-compose:${SHORT_SHA}"

   secretEnv: ["DAGSTER_POSTGRES_PASSWORD"]

availableSecrets:
 secretManager:
   - versionName: projects/${PROJECT_ID}/secrets/DAGSTER_POSTGRES_PASSWORD/versions/1
     env: "DAGSTER_POSTGRES_PASSWORD"
Testing the Cloud Build instructions
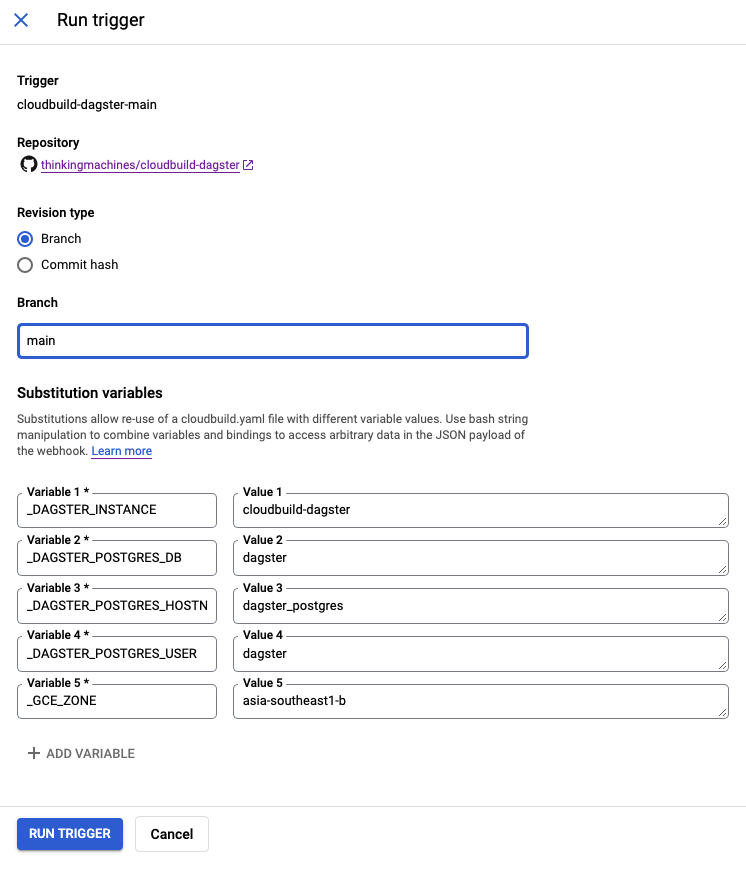
If you want to test the workflow by simulating a git push, make sure the trigger’s status is Enabled and do a dummy git push to your remote main branch.Alternatively, you can just manually run the trigger using the RUN button on the right side of the Cloud Build triggers page.

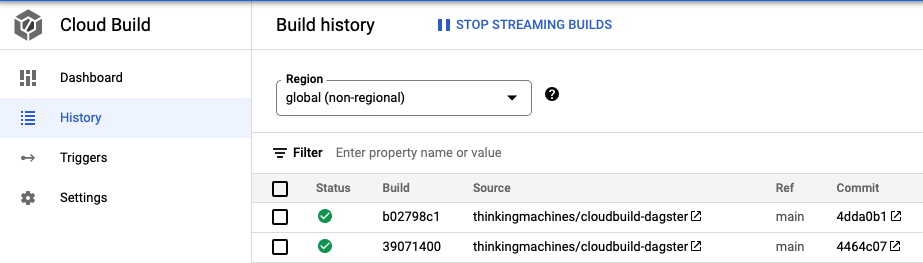
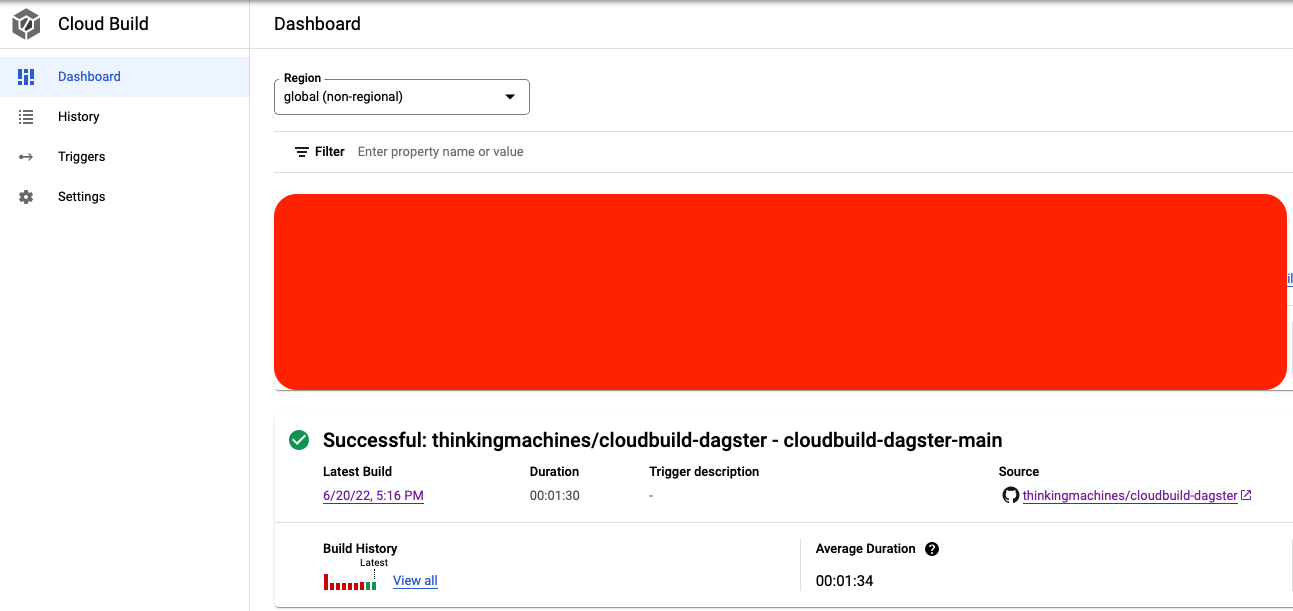
To see the status of your build, you can either go to the History page or Dashboard
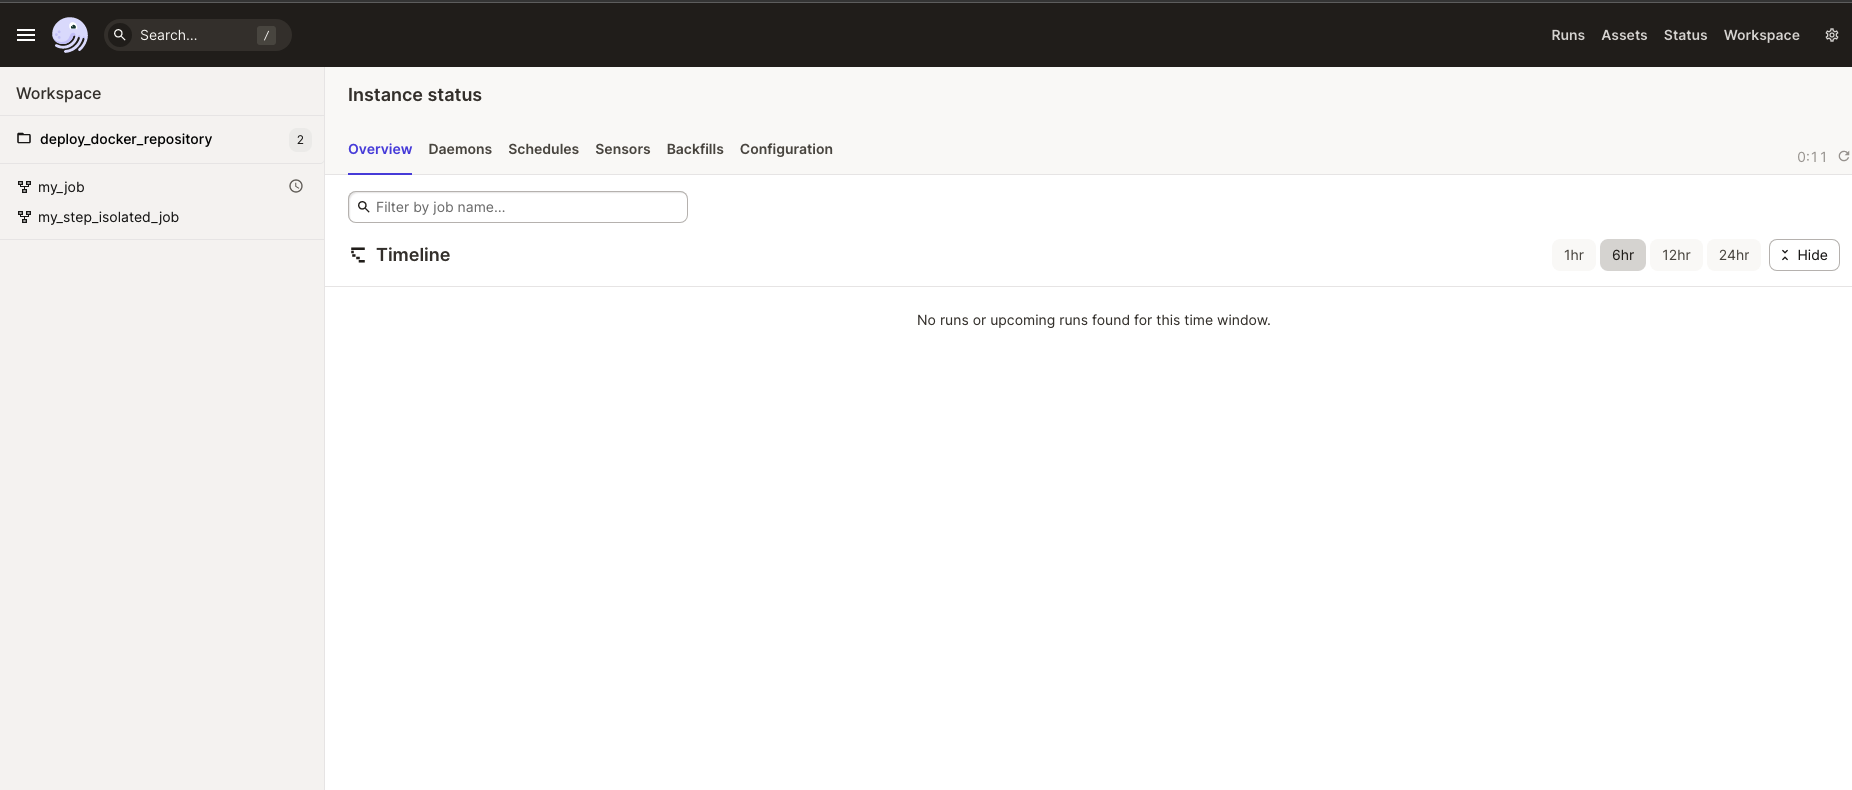
Checking out your Dagster application
If you want to see the fruits of your and cloud build’s labor, try running this command on your local machine and visiting localhost:3000
gcloud compute ssh --tunnel-through-iap --project --zone --ssh-flag "-L 3000:localhost:3000"
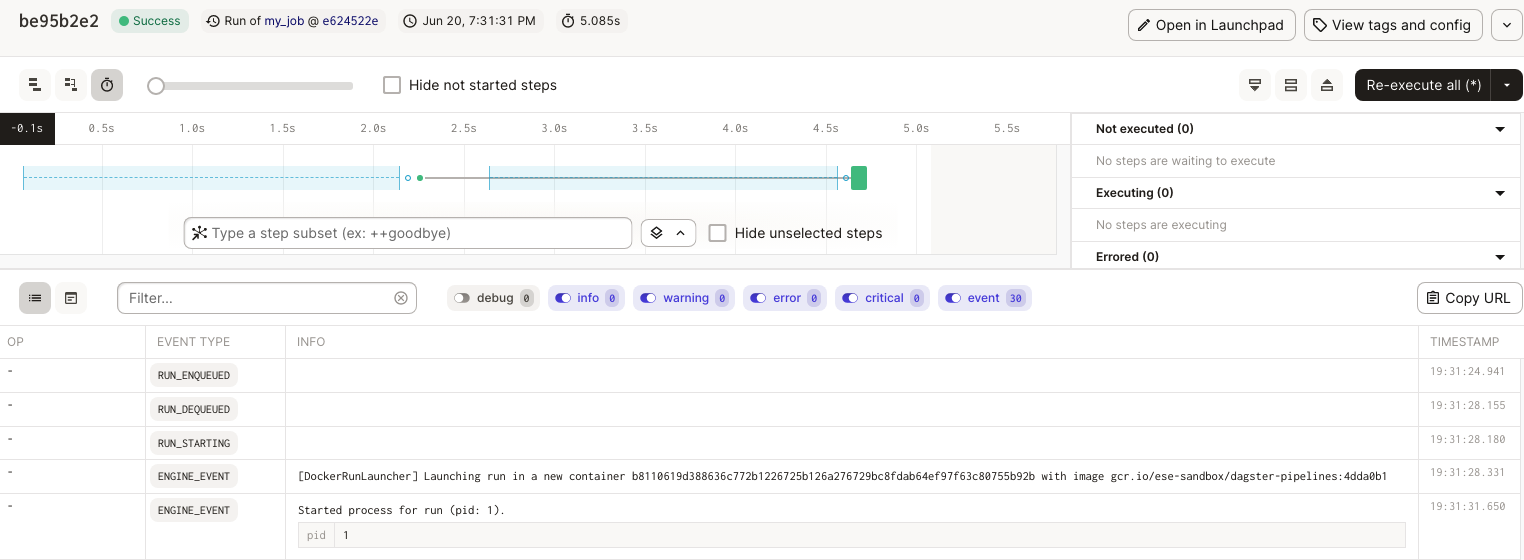
You now have access to Dagit! Now go ahead and try to launch a new pipeline run. You’ll notice that a temporary container is created just for that specific pipeline launch.
What did we learn?
The first half of this guide taught us how to containerize the services that make up a Dagster application deployment. We then learned how to properly configure and use Cloud Build to achieve continuous deployment for our Dagster application.
What are the benefits gained from using Cloud Build?
- Repetitive deployment tasks are automated
- Releases or updates are consistently audited through build histories
There you have it! We hope that you found this blog post helpful. At TM, we're always building efficient and scalable data pipelines as part of our mission to help people and organizations make impactful data-driven decisions. If that sounds exciting, well you’re in luck because we’re hiring! If you’re interested in joining us, feel free to drop your application through our careers page.